What is 7-Zip?
7-Zip is a free and open-source file compression software that allows users to create and extract archive files in various formats. It supports popular archive types such as 7z, RAR, ZIP, TAR, and more. One of the key features of 7-Zip is its ability to create highly compressed archives, significantly reducing file sizes. For instance, with the recommended settings, it can compress a 1GB file into just 20MB or even less without losing any data.
This makes 7-Zip an excellent tool for users who need to save storage space, share files over the internet, or store large amounts of data efficiently. In this guide, we will provide step-by-step instructions on how to achieve maximum compression using 7-Zip and optimize its settings for better results.
Why Use 7-Zip for File Compression?
A file archive manager like 7-Zip is essential for every computer user, especially when dealing with large files. The benefits of using 7-Zip for compression include:
- Significant reduction in file size: Compress large files into smaller archives to save storage space.
- Faster file transfers: Smaller file sizes make it easier to share files via email, cloud storage, or USB drives.
- Multi-format support: Works with various compression formats such as ZIP, RAR, TAR, and 7z.
- Open-source and free: Unlike some paid alternatives, 7-Zip is completely free to use.
- High compression ratio: Uses the advanced LZMA and LZMA2 compression algorithms for efficient compression.
7-Zip Best Compression Method to Compress 1GB to 20MB:
Using some file compression tools, we can compress 1 GB of data to 20MB or less. 7-Zip is one such program used to compress files highly. 7-Zip is a very powerful free and open-source file archive and compression software. Here are the steps to compress files using 7-Zip with the best compression method.
Please remember that this compression process does not apply to all types of files. Text files like .txt files, documents, spreadsheets, PDF files are highly compressible. But you cannot compress some files such as mp3, mp4, videos clips etc using 7-Zip or other such types of software.
7-Zip is the best compression software that allows you to take several files and compress them into one file, which is smaller than the overall size of the original files. But, keep in mind that you cannot compress Videos, Mp3s, and JPEGs hugely compared to the original files as these types of files have already been compressed.
By tweaking the compression settings in 7-Zip, it is possible to reduce file sizes dramatically. However, the level of compression depends on the file type. Text-based files, such as .txt, .docx, .xlsx, and PDFs, can be compressed significantly, whereas already compressed formats like MP3, MP4, and JPEG do not shrink much further.
Follow these optimized steps to achieve the best compression ratio in 7-Zip.
Steps to Create a Compressed Archive With 7-Zip:
First of all, download the 7-Zip software from here. After the download is complete, find the 7-Zip setup file in the download folder, double-click on the setup file, and then click on “Install” to set up 7-Zip on your computer. After a few moments, the installation will be completed. Once installed, you can launch the application
Video Tutorial:
Here is a video tutorial on a YouTube Channel, namely Random Tech, on 7-Zip Best Compression Settings to create a highly compressed archive:
Text and Graphics Tutorial:
To create a compressed archive, put your files and folders in one place or folder that you want to compress. Now, drag and select all these files/folders
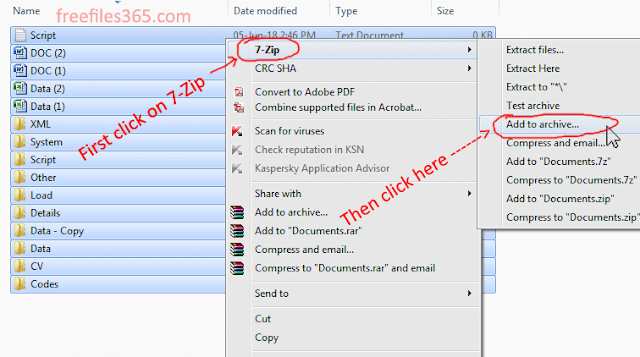
When you install 7-Zip, it automatically adds a 7-Zip tab in the context menu. After selecting the files, right-click on the selected files and select “7 Zip” from the context menu and then click on the “Add to archive” option (as shown in the below image).
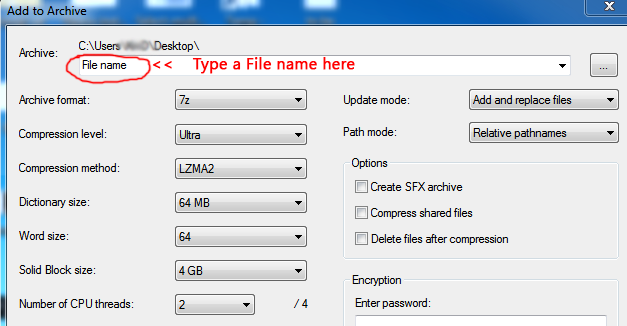
The 7-Zip compression window will open after selecting the “Add to Archive” option. Now you have to set the values properly in this 7-Zip window to make a highly compressed archive. First of all, type the name of your archive and then move to the next option, “Archive Format“. If “7z” is already selected, then you don’t have to change this. Otherwise, click on the drop-down list and select “7z” manually from the list. Then select the Compression level from the list as “Ultra” and the Compression Method as “LZMA2“. LZMA (Lempel–Ziv–Markov chain algorithm) is a precise rule used to perform lossless data compression, and LZMA 2 provides a better compression ratio than LZMA.
After that, set the size of the Dictionary Size to 64 MB. Dictionary size is an important factor, and many important things such as compression ratio, compression speed, and system resources, depend on the “Dictionary Size“. Using a higher dictionary size gives better compression, but more system resources are required to complete the compression and decompression process.
Now move to “Word Size” and use 64 from the drop-down list to maintain an average compression speed. After the Word Size, the next option is the Solid Block size. This option allows you to improve the efficiency of the compression of many similar files together.
Then, the number of CPU Threads is recommended not to use all the CPU Threads for file compression. If you have 4 CPU Threads, then use only 2 Threads for the file compression, or if your PC has 8 Threads, then you can use 6 Threads. Using all the CPU threads will help you make your compression faster, but can make your PC slow during compression or decompression.
Another important option to set in this 7-Zip window is the Split to Volumes. This option allows you to split your large file into smaller pieces. Suppose you are unable to attach a file to your e-mail due to its huge size; then you can divide the large file into smaller files with this option. To do so, click on the arrow mark (dropdown menu) just under the Split to Volumes option and select the size limit of the files (e.g., 100MB, 700MB, 4GB). After compression, the file will be divided into multiple smaller parts.
Now, double-check all the settings and then click OK to begin the compression process. Depending on file size and system resources, this process may take a few minutes to complete. Once finished, you will see a compressed .7z archive file in the same location as the original files.
Note that to extract split archives, all the parts must be present in the same folder, and 7-Zip must be installed.
Primary Settings in 7-Zip:
- Archive Format: Select 7z (this provides better compression than ZIP or RAR).
- Compression Level: Set to Ultra (this ensures maximum compression, though it takes longer).
- Compression Method: Choose LZMA2 (this provides a better compression ratio compared to LZMA).
- Dictionary Size: Set to 64MB (higher dictionary sizes improve compression but require more RAM).
- Word Size: Select 64 (this balances compression efficiency and speed).
- Solid Block Size: Enable Solid Archive (this is beneficial when compressing multiple similar files).
- Number of CPU Threads: If you have multiple CPU cores, allocate a lower number of threads (e.g., use 2 threads if you have 4 cores) to avoid slowing down your PC.
Limitations of 7-Zip Compression:
While 7-Zip is highly efficient at compressing certain file types, some files do not compress well. These include:
- Multimedia files (MP3, MP4, AVI, JPEG, PNG): These formats are already compressed, so further reduction in size is minimal.
- Encrypted or encoded files: Some files, such as encrypted PDFs or executables, may not compress effectively.
- Random or highly unique data: Files with high entropy, such as encrypted archives, do not see major compression benefits.
Can You Compress Video Files Using 7-Zip?
No, you cannot significantly compress video files using 7-Zip. Most modern video formats, such as MP4, AVI, and MKV, already use advanced compression techniques to maintain high-quality output while reducing file sizes. If you need to reduce video size, use dedicated video compression tools like HandBrake or FFmpeg instead.
Conclusion
Using the best 7-Zip compression settings, you can achieve a significantly reduced file size, especially for text-based documents and archives. The Ultra compression level combined with LZMA2 and an optimized dictionary size, ensures the best results. However, remember that certain file types, such as multimedia and encrypted files, do not compress well. If you follow the steps outlined in this guide, you can effectively manage storage, speed up file transfers, and enhance data efficiency with 7-Zip.


waw, its really working. thanks for the tips. I've compressed my 110 mb Excel files to just just 8.5 mb.